
DIY Busy Light (Teams)
As someone who practically lives in headphones at the office - whether I’m on a call, jamming to music to stay focused, or just drowning out the chaos of office chatter - it’s not always easy for others to figure out if I’m approachable or deep in my personal sound bubble.
With plans for a new open-space office (read: more people, more noise, more chaos), it became clear that I needed a better way to signal when it’s okay to interrupt me. And thus, the idea of the busy light (patent pending ;-) was born.
Table of content
- Step 1 (Teams Presence detection)
- Step 2 (Hardware)
- Step 3 (Setting up the Raspberry Pi)
- Step 4 (Case)
- Step 1.5 (Teams Presence detection - the script)

Step 1 (Teams Presence detection)
Being lazy AF, I wasn’t thrilled by the idea of constantly updating my status by hand. What I needed was a way for the busy light to reflect my Teams status effortlessly.
The challenge? My company’s IT policies aren’t exactly flexible. Running custom software? Nope. Hacking together quick fixes? Forget it. So, I had to get creative to figure out how to track status changes in Teams.
Most of the solutions I found revolved around Microsoft APIs like Microsoft Graph to pull presence data. Great idea - if you’re allowed to use them. Even trying to set up an Azure app with my personal Microsoft account didn’t work. Another option off the table.
Then there were the Teams log files. Some guides mentioned you could use them to detect presence changes, but others pointed out that newer Teams versions don’t create usable logs anymore. It felt like a dead end. But frustration pushed me to take another look at the logs. And finally, I found a glimmer of hope.
C:\Users\<USERNAME>\AppData\Local\Packages\MSTeams_8wekyb3d8bbwe\LocalCache\Microsoft\MSTeams\LogsIn the Teams log folder, you’ll find all the logs created by Microsoft Teams. The one you need to focus on is named MSTeams_*.log.
When changing the status in Teams, there are two possible ways this change might be recorded in the logs - or, in some cases, both might appear. The second option seemed cleaner because it allowed you to simply scan for the keyword GlyphBadge with the corresponding status.
Option 1:
native_modules::TaskbarModule: ShowBadge New Badge:NumericBadge{0}, overlay: 0 Elemente, Status Beschäftigt
TaskbarBadgeServiceLegacy:Work: SetBadge Setting badge: NumericBadge{0}, overlay: 0 Elemente, Status Beschäftigt
TaskbarBadgeServiceLegacy:Work: SetBadge PreSetBadge verification: NumericBadge{0}, overlay: 0 Elemente, Status Beschäftigt
Option 2:
native_modules::TaskbarModule: ShowBadge New Badge:GlyphBadge{"busy"}, overlay: Keine Elemente, Status Beschäftigt
TaskbarBadgeServiceLegacy:Work: SetBadge Setting badge: GlyphBadge{"busy"}, overlay: Keine Elemente, Status Beschäftigt
TaskbarBadgeServiceLegacy:Work: SetBadge PreSetBadge verification: GlyphBadge{"busy"}, overlay: Keine Elemente, Status Beschäftigt
I began developing a small script to scan the log folder every x seconds. The script reads the latest log file, searches for presence changes, and forwards this information to the busy light. Everything was working perfectly until one day it suddenly stopped. Upon inspecting the logs, I noticed that the second option had disappeared, leaving me with the "messier" status notification. Both log formats include the status in a line that ends with Status <currentStatus>.
However, the status appears in the language you use in Teams. This led to another challenge: dealing with special characters like the famous German umlauts (ä, ö, ü). I didn’t want to send the translated status directly to the busy light; instead, I needed "clean" status values like busy, away, available, or dnd. To handle this, I prefer adjusting the script running on my workstation rather than modifying the busy light itself.
For scripting, I chose Microsoft PowerShell since it’s the only coding environment I can use without requiring additional admin permissions. While I’m not an expert in PowerShell, I can write functional scripts with some help from the documentation. And, since I’m still lazy, I turned to the mighty ChatGPT to assist in writing the code. One of the features I specifically requested was the ability to manually override the status. For example, I wanted the option to set the busy light to "Do Not Disturb" while remaining available for calls in Teams. This flexibility ensures the light reflects my preferred status, even if it doesn't perfectly match my actual Teams presence.
This can be adjusted by launching PowerShell with admin privileges and executing the following command. This sets the system to allow local script execution while requiring remote scripts to be signed:
Set-ExecutionPolicy -ExecutionPolicy RemoteSigned
Step 2 (Hardware)
Inspired by Elio's guide, I decided to use the same hardware components for my project. At the time of writing, the total hardware cost (excluding the case) is approximately €55 - assuming you’re ordering directly from Amazon and not hunting for alternative suppliers or the best deals. 😉
- Raspberry Pi Zero WH (* Ref-Link)
- Waveshare Full True Color RGB LED HAT (* Ref-Link)
- Micro SD (e.g. this one) (* Ref-Link)
- Micro USB cable (e.g. this one) (* Ref-Link)
- The power supply could definitely be improved. A shorter cable or a different case design that allows the cable to connect directly to the Raspberry Pi would make the setup cleaner and more practical.
- Case (see below)
Step 3 (Setting up the Raspberry Pi)
There’s no need to reinvent the wheel, so I followed Elio’s guide for both the operating system and the software that controls the LED. The software, provided by Elio, is available on GitHub. I’m not looking for credit here - I simply want to document the challenges I encountered and the changes I had to make to get everything up and running.
OS
Elio recommends using DietPi as the operating system, so let’s start by going over the setup process.
First, download the DietPi image from the official website and use balenaEtcher to flash it onto your SD card. After flashing, you may need to reinsert the SD card to access it and make the necessary configuration changes. For detailed documentation about all available options, refer to the dietpi.txt file included in the image. Feel free to adjust any other settings to suit your needs.
Edit dietpi.txt
# localization settings
AUTO_SETUP_LOCALE=de_DE.UTF-8
AUTO_SETUP_KEYBOARD_LAYOUT=de
AUTO_SETUP_TIMEZONE=Europe/Berlin
# use wifi instead of ethernet
AUTO_SETUP_NET_ETHERNET_ENABLED=0
AUTO_SETUP_NET_WIFI_ENABLED=1
# don't wait for network connection to boot
AUTO_SETUP_BOOT_WAIT_FOR_NETWORK=0
# disable HDMI/video output
AUTO_SETUP_HEADLESS=1
# on first boot start setup without any user input
AUTO_SETUP_AUTOMATED=1
# install software packages during initial setup: Git, Vim, RPi.GPIO
AUTO_SETUP_INSTALL_SOFTWARE_ID=17
AUTO_SETUP_INSTALL_SOFTWARE_ID=20
AUTO_SETUP_INSTALL_SOFTWARE_ID=69
#optional
AUTO_SETUP_NET_HOSTNAME=BusyLight
AUTO_SETUP_NET_WIFI_COUNTRY_CODE=DE
AUTO_SETUP_DHCP_TO_STATIC=1
CONFIG_SERIAL_CONSOLE_ENABLE=0
CONFIG_ENABLE_IPV6=0
SURVEY_OPTED_IN=0
Add your WiFi credentials to the dietpi-wifi.txt and adapt any other settings as needed.
Edit dietpi-wifi.txt
aWIFI_SSID[0]='tzwaeaen.de'
aWIFI_KEY[0]='ThislooksaprettyniceWIFIpassword1!'
Plug in the USB cable to boot up the Pi. It may take a few minutes for the Pi to connect to the WiFi. Check your router or use a network tool to find the assigned IP address. Once the Pi is connected, you can use SSH to monitor the installation progress. If you haven’t changed the default credentials, the username is root and the password is dietpi. After the installation is complete, the Pi will reboot. Once it restarts, you can reconnect to proceed with the next steps.
Busy Light service
Elio also provides a service to control the LED hat. All the details are available in the GitHub repository, but before diving into those specifics, let’s first discuss how to control the light from my business laptop.
In my work environment, I don’t have access to WiFi, and constantly “hacking” into the guest WiFi with changing access credentials wasn’t a practical solution. I considered setting up a mobile hotspot to send the current presence status to my public server, allowing the busy light to retrieve it from there. Another option was using the serial port and SSH to send commands directly, but I wasn’t sure if installing the RNDIS driver would be possible.
Eventually, I stumbled across some articles that basically turned the Pi into a glorified USB stick. That’s when the light bulb went off - why not expose the Pi as a drive, write the presence data to a file, and let a script on the busy light pick it up from there? It’s not the most elegant solution, but hey, if it works, it works!
I created a GitHub repository to organize my scripts and tools, making it easier to complete the setup. The first script (setup.sh) handles the entire setup process after DietPi is installed. It downloads all the required modules, installs Elio’s busy light service, and configures everything needed for the USB stick functionality. The script wraps up with an automatic reboot, and just like that, we’re ready to go!
--break-system-packages and ran everything as the root user. Is there a better solution? Probably. Do I care? Not at all - this device has one job, and that’s all that matters. 🥸mkdir -p /home/pi && wget -O /home/pi/setup.sh https://github.com/tzwaeaen/busy-light/raw/refs/heads/main/DietPi/setup.sh && chmod +x /home/pi/setup.sh && /home/pi/setup.shElio’s service comes with a built-in server and an integrated API to control the LED colors - pure magic. If the Pi is connected to a network, you can access the portal via <IP>:5000 in your browser.
To automate things, I asked ChatGPT to whip up a small Python script. The script monitors the status file on the drive for changes and calls the API accordingly. However, when the Pi is connected to the laptop via USB, I couldn’t access the file directly - I had to read the binary file instead. That’s why I decided on the following format for the file content: #currentStatus=busy#. The Python script (status_monitor.py) is installed through the setup script mentioned earlier and starts automatically after the Pi boots.
Step 4 (Case)
- 4x M3 Ruthex (*RefLink)
- 4x M3x16 screws (e.g. these) (*RefLink)
- 8x 6x2mm magnets (e.g. these) (*RefLink)
- 3D printer ;-)
- superglue
- hot glue (optional)
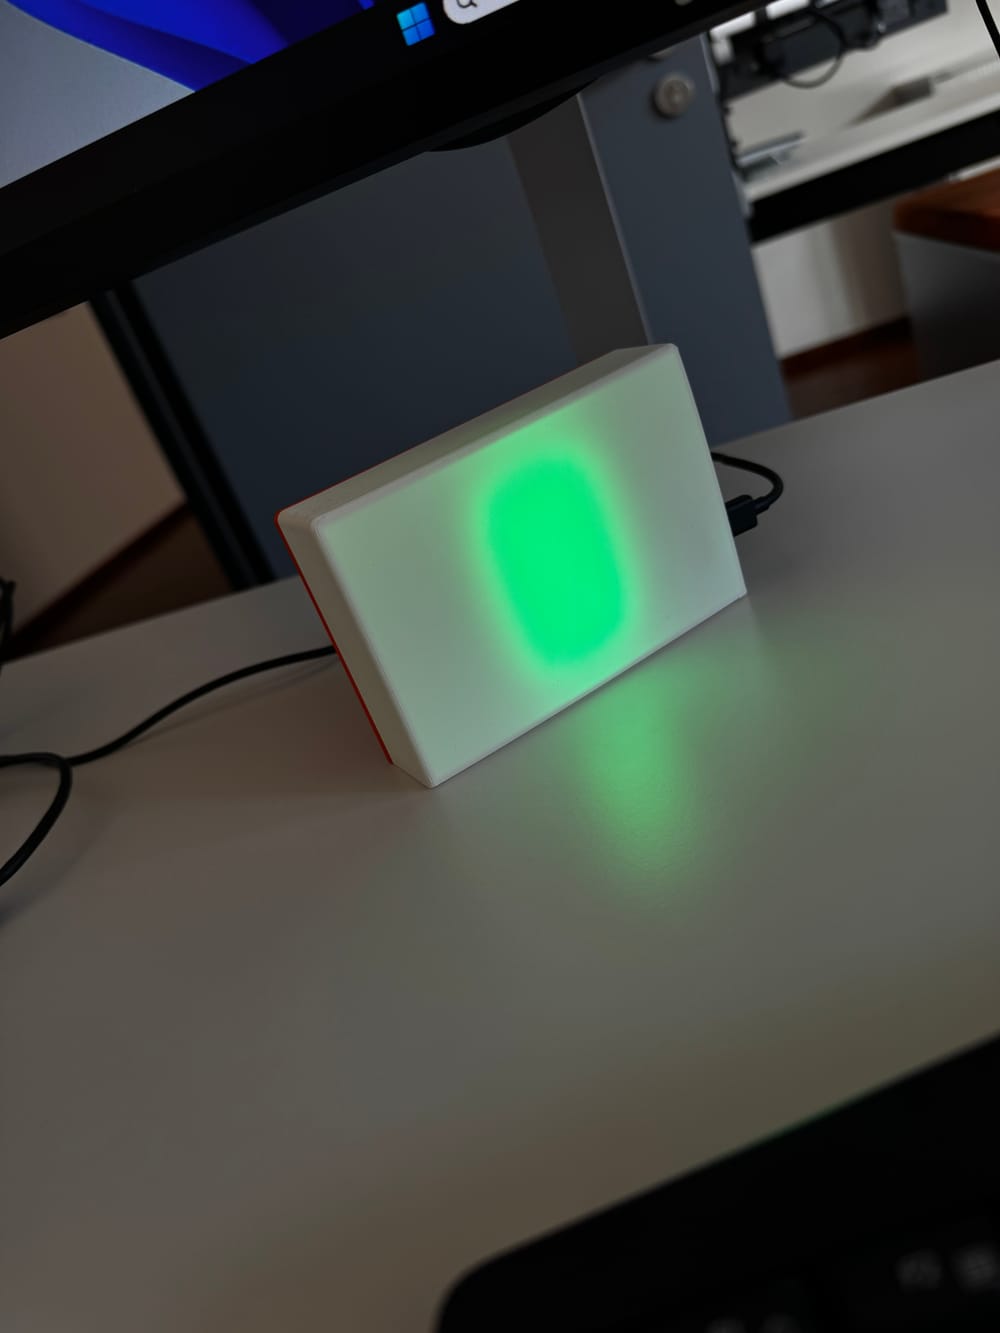
Up until this point, the struggles were at kindergarten level. But the real challenge? The case. Owning a 3D printer (Bambu Lab P1S) is great fun - there are millions of models just a click away, ready to print. The problem? None of them fit my needs for a desk-friendly case to use in the office.
With the help of my colleague Cryd - and a great deal of patience - I managed to somehow grasp the basics of Fusion 360 and start designing a custom case.
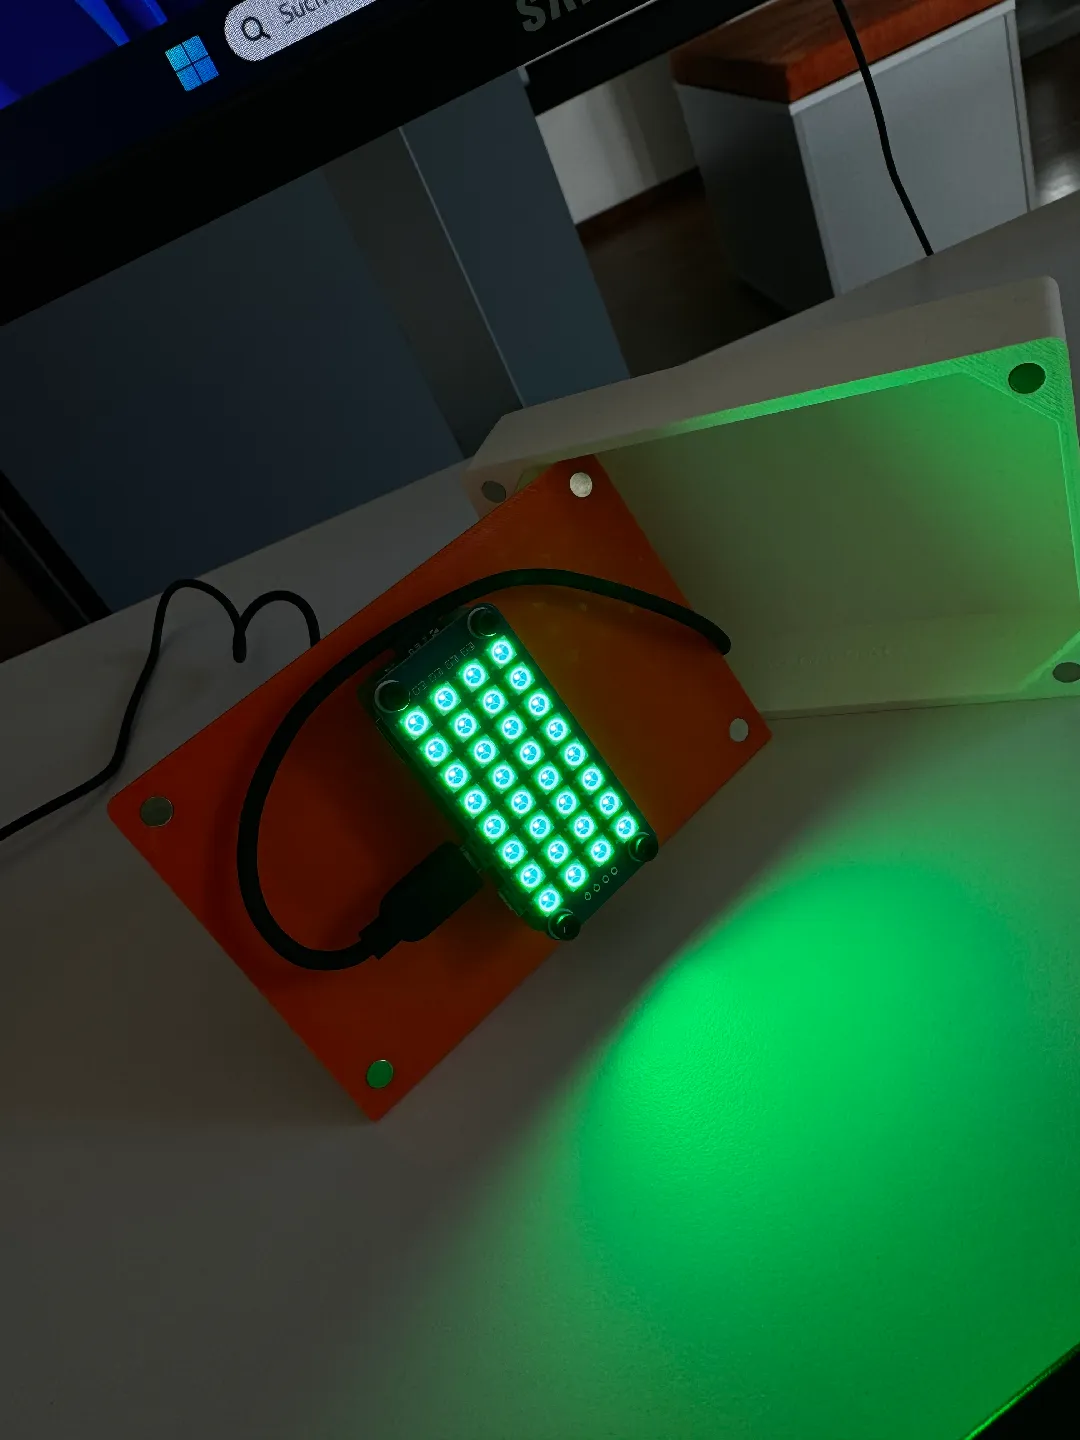
Due to the bend of the USB cable when attached inside the case, the design ended up being slightly wider. The recess for the USB port also isn’t perfect. I added a support behind it and initially planned to glue the cable in place. However, since I don’t own a hot glue gun, I tried superglue instead - but it kept coming loose. In the end, I resorted to zip ties to force everything into place. For the next revision, I plan to add more supports on all sides to secure the cable better.
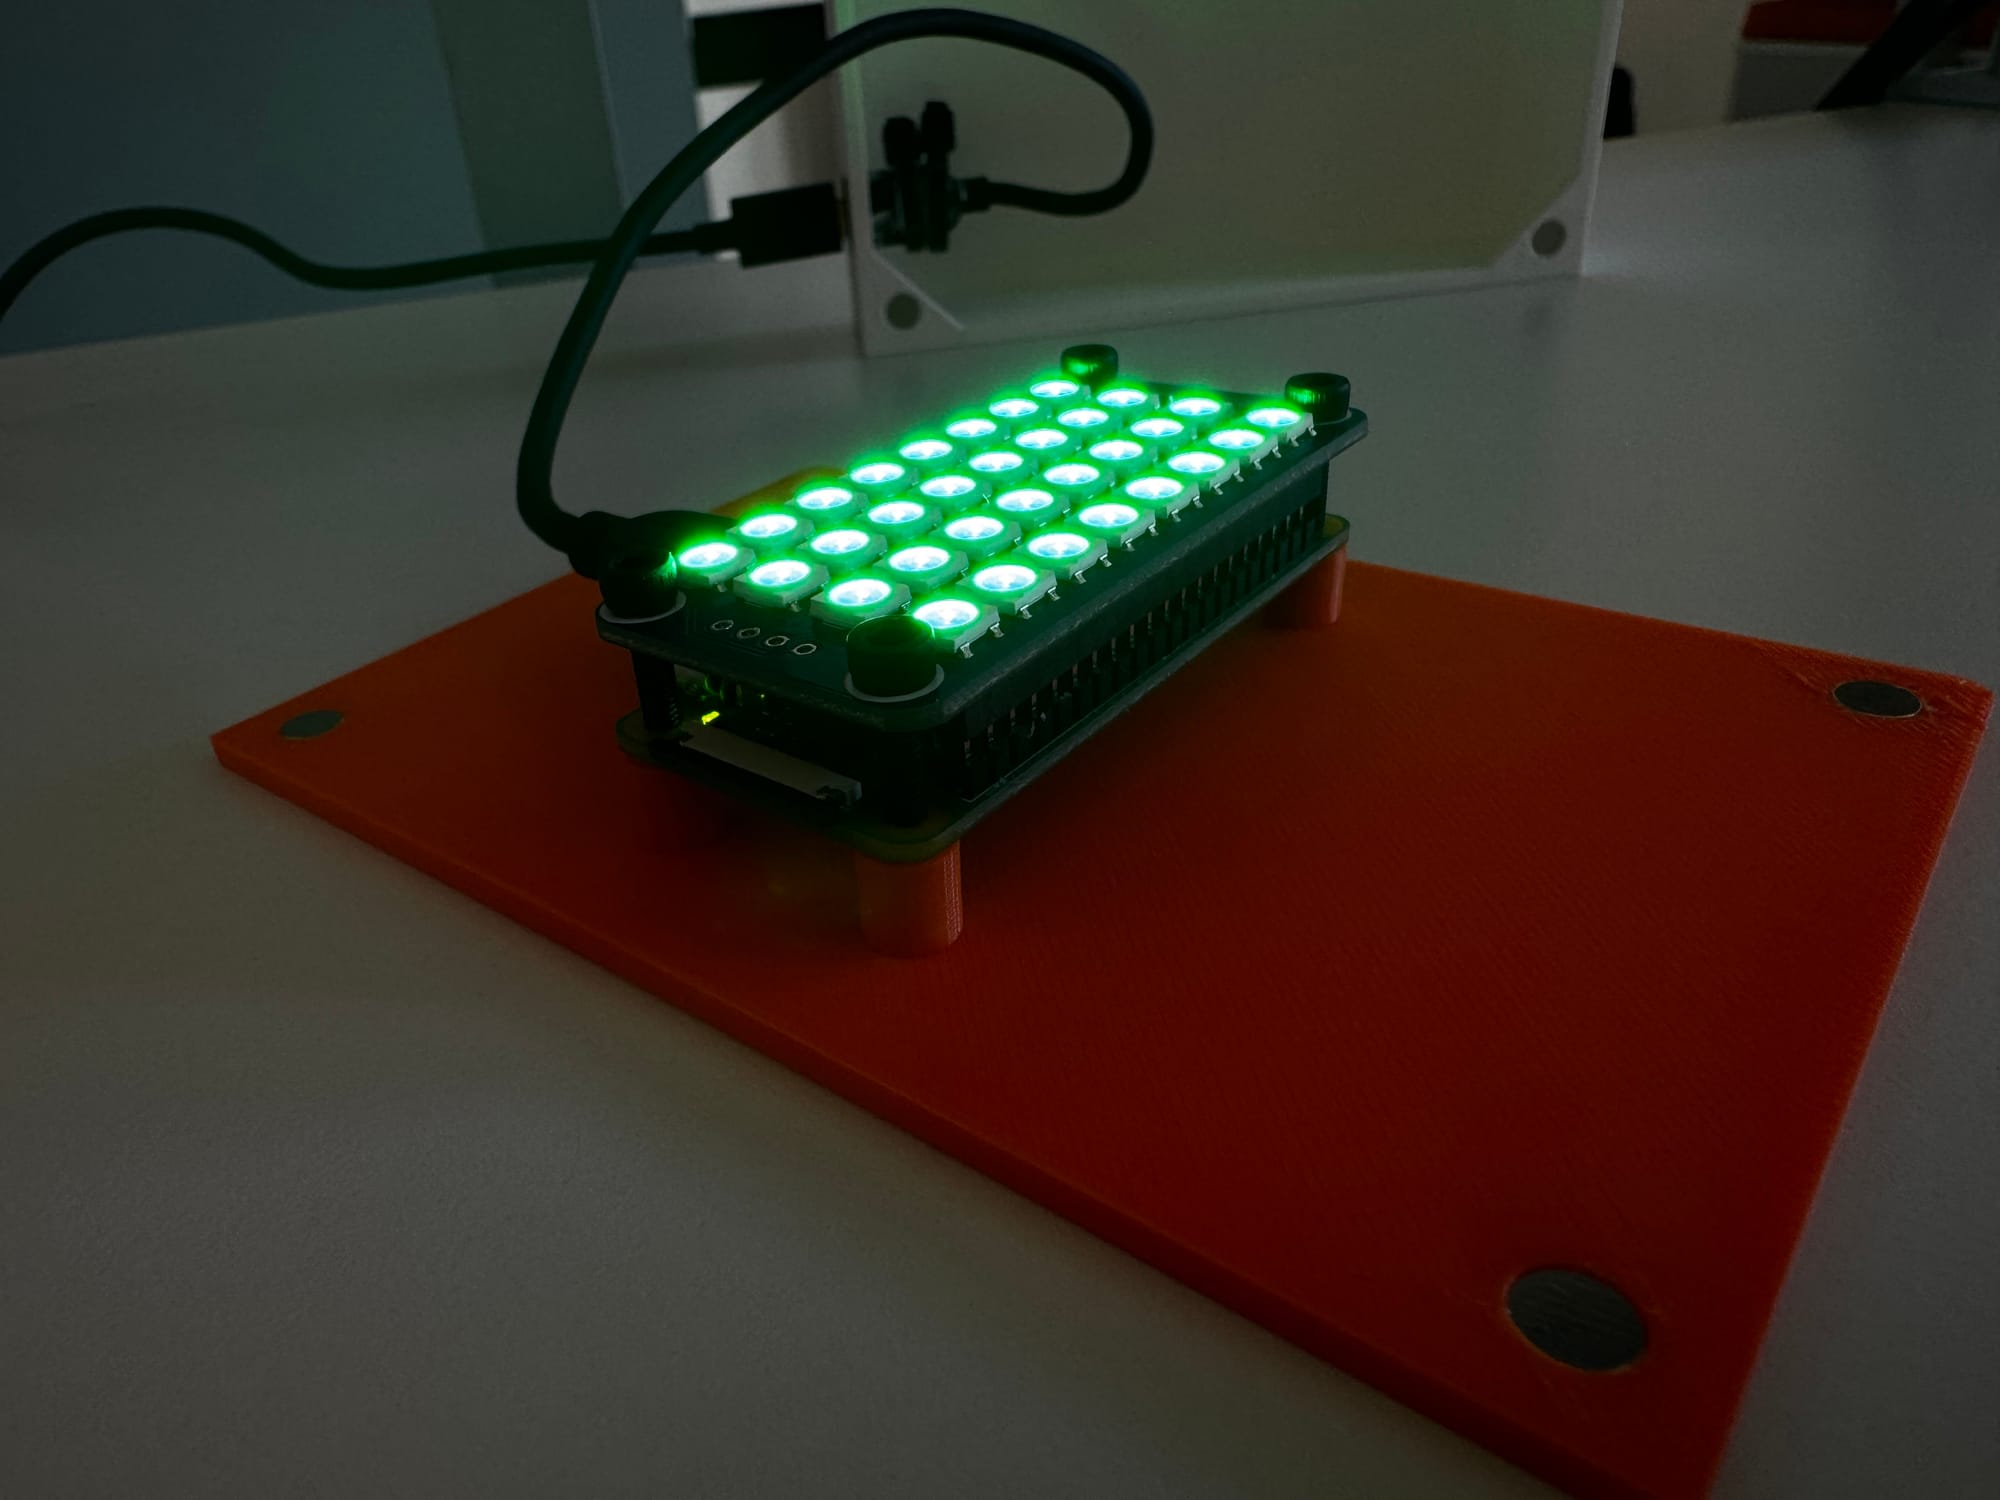
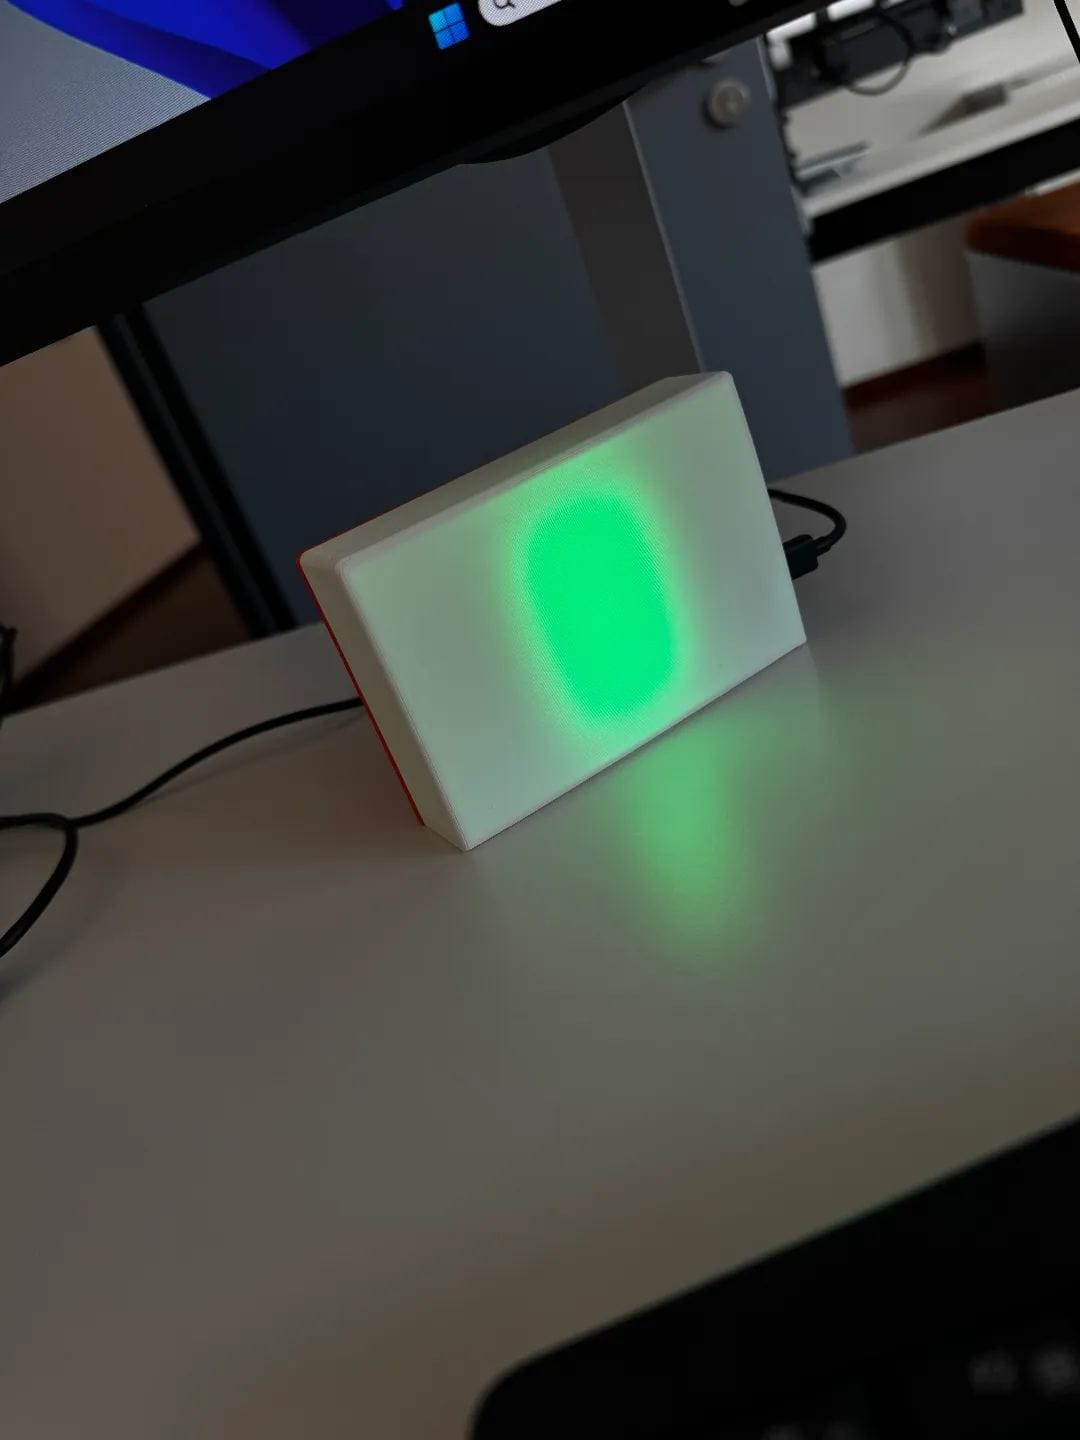
Another issue is that the LED hat sits a bit too close to the lid. This results in the light being distributed more in the center rather than evenly across the sides. A simple fix would be to increase the distance between the LED hat and the lid or shrink the case slightly to eliminate this issue altogether.
For now, I’m pretty proud of what I’ve achieved so far, and the model is available on Printables for anyone interested.
Step 1.5 (Teams Presence detection - the script)
I could have included the script right at the start, but where’s the fun in that? 😜 The PowerShell script (status_monitor.ps1), along with all the other code, is available in my GitHub repository.
To use it, download the script, open a PowerShell console, and run it with .\status_monitor.ps1.
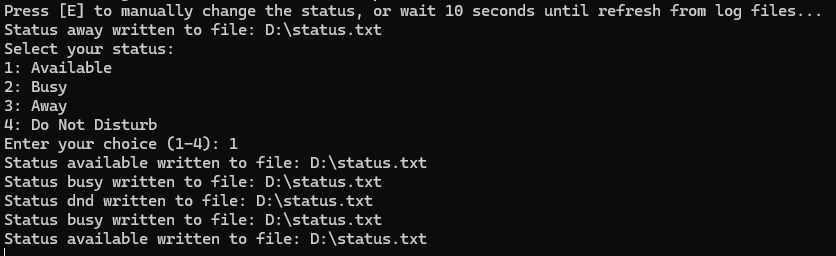
Keep in mind, this isn’t an out-of-the-box solution - you might need to tweak some scripts, especially if your Teams installation isn’t running in German. 😉
# Mapping Teams statuses to custom statuses
$statusMapping = @{
    "beschäftigt"  = "busy"
    "nicht stören" = "dnd"
    "verfügbar"    = "available"
    "abwesend"     = "away"
}
(* Ref-Link) This article contains referral (ref) links. If you make a purchase through these links, I may earn a small commission at no extra cost to you.
